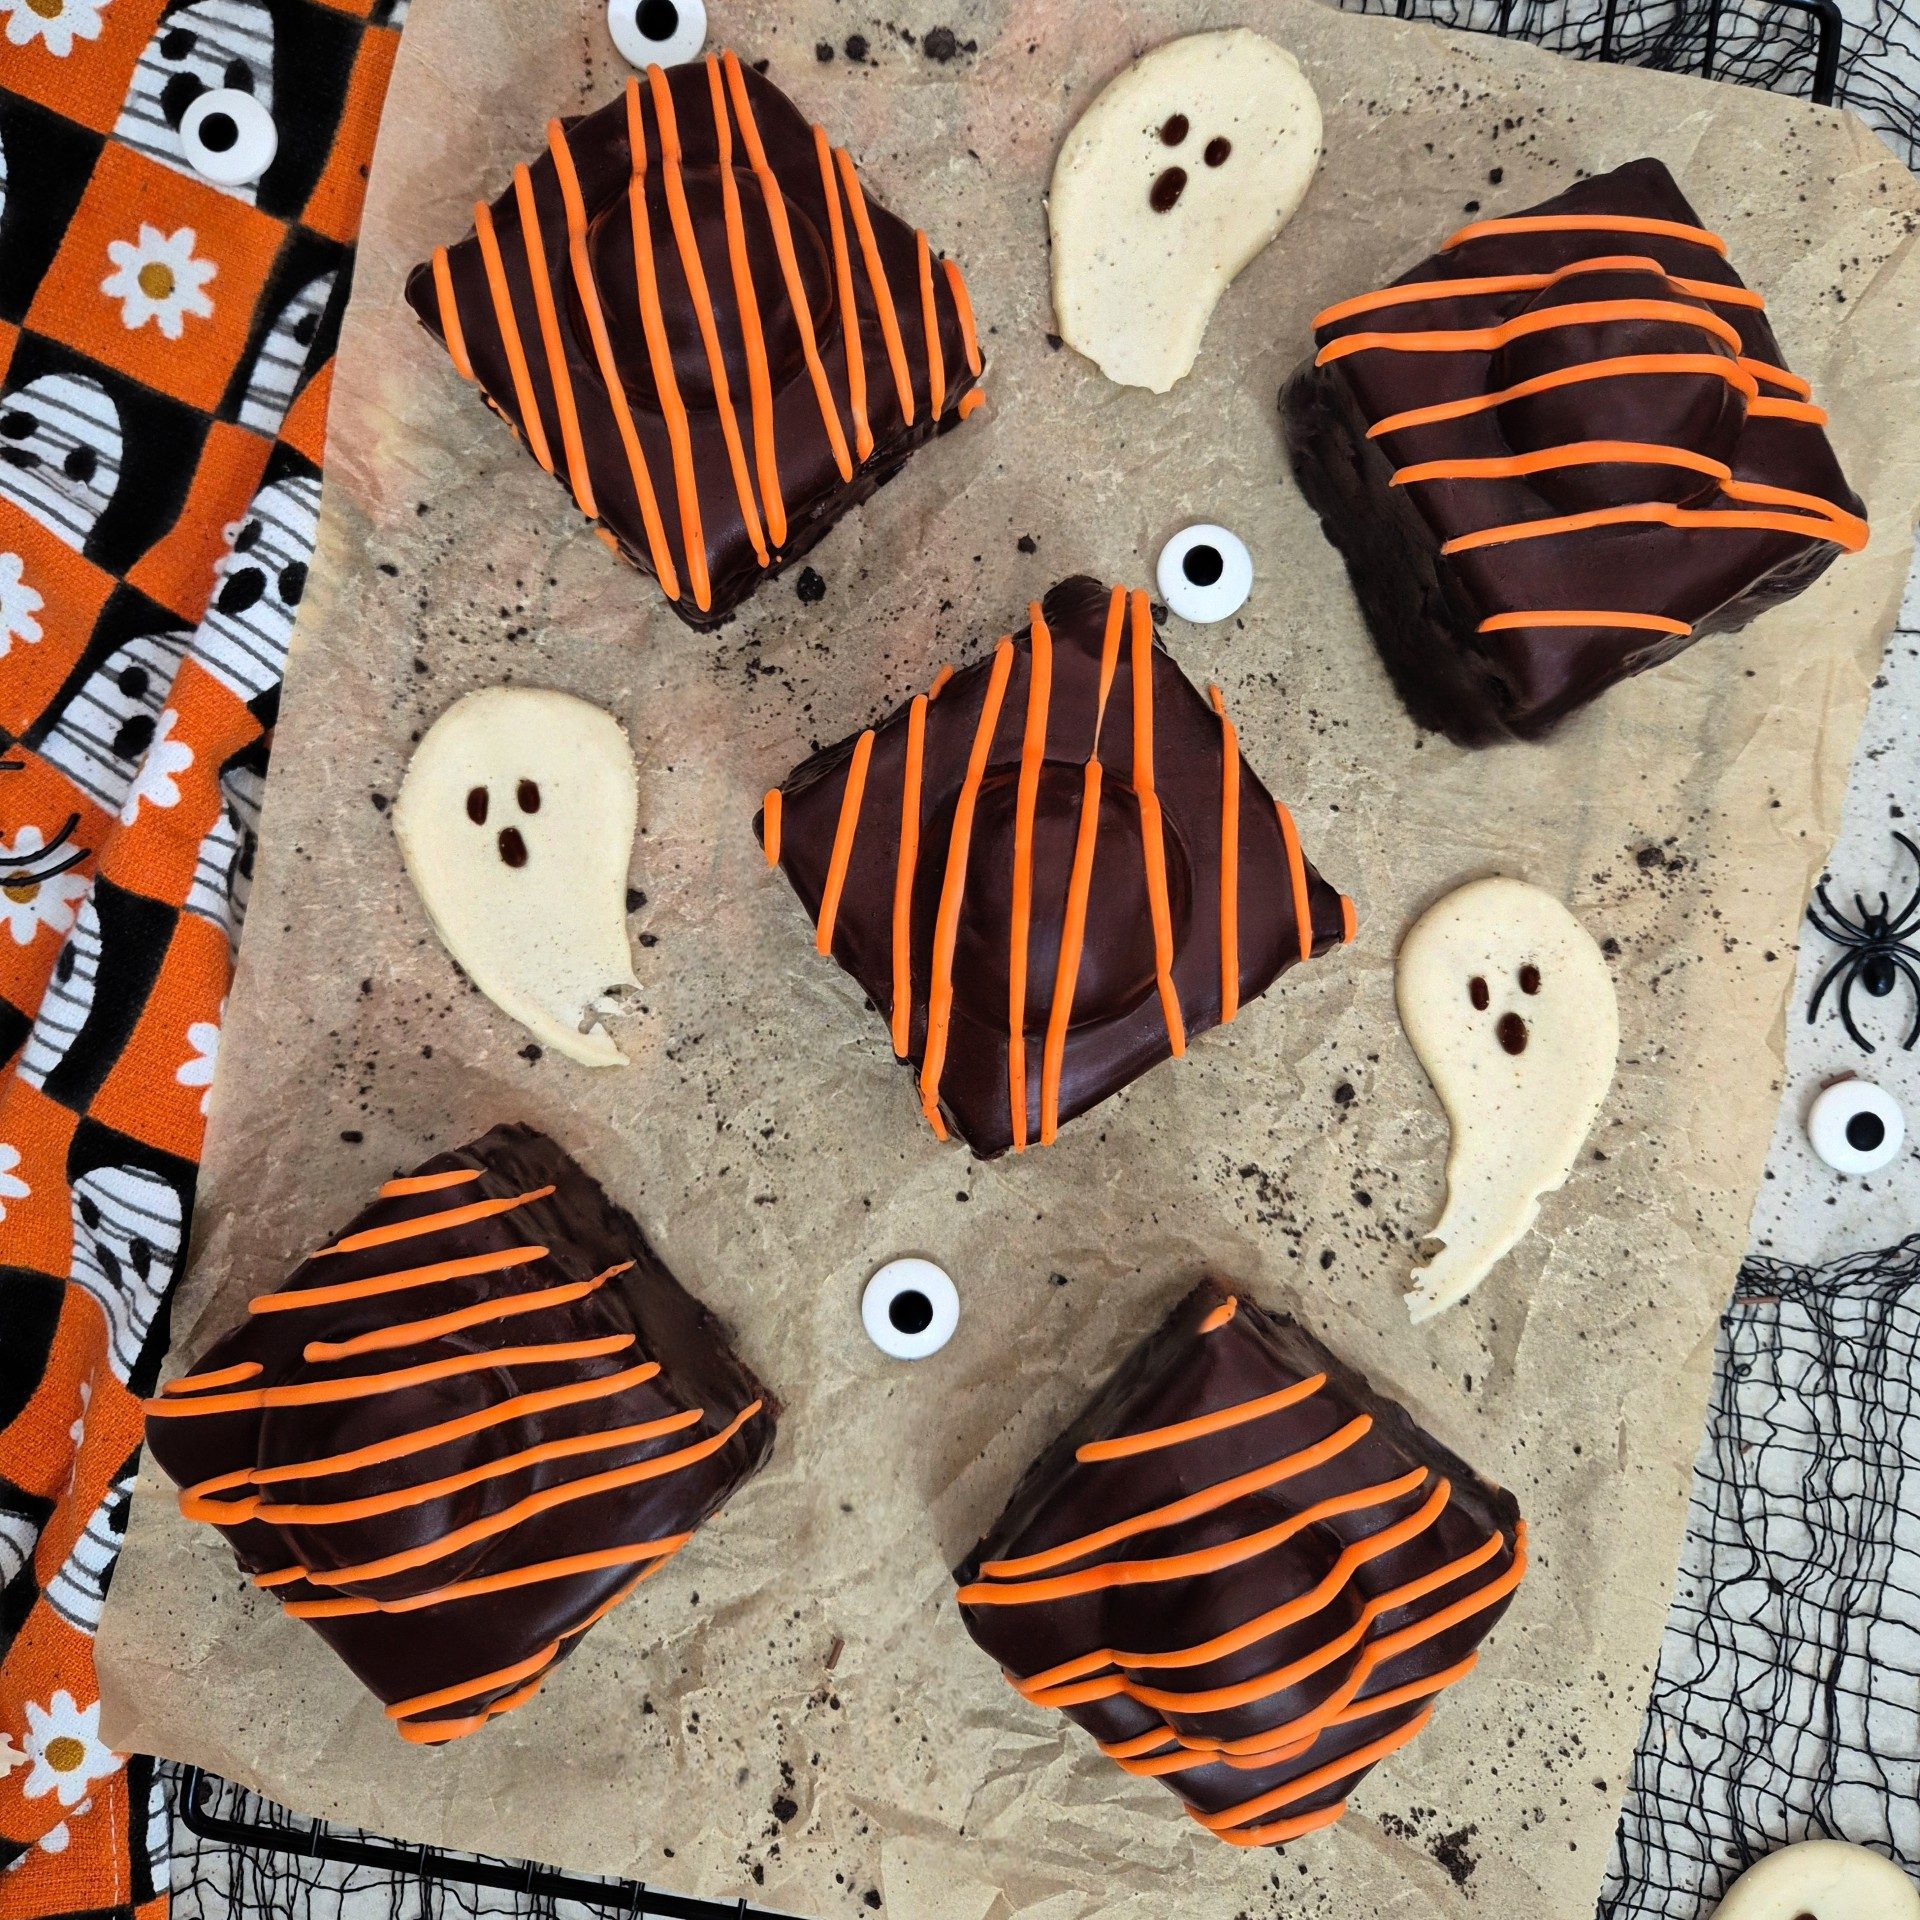
Halloween Fondant Fancies. Mini chocolate sponges filled with orange coloured buttercream, coated in chocolate icing & orange drizzle. A must-bake Halloween treat!

Halloween Fondant Fancies
These Halloween Fondant Fancies are the ultimate spooky-season bake! Light and fluffy mini chocolate sponges, filled with creamy orange buttercream, coated in smooth chocolate icing, and finished with a drizzle of orange-coloured icing. Perfect for Halloween parties, autumn gatherings, or a fun weekend baking project, these cute little cakes will impress both kids and adults alike.
Just like the classic Mr Kipling Fondant Fancies, but with a delicious Halloween twist. These are homemade, rich, and perfect for the halloween season!
They’re bite-sized, cute, and perfect for Halloween parties, school treats, or even an afternoon tea with a seasonal twist. Whether you’re baking for kids or adults, these fondant fancies are guaranteed to impress!
Honestly, ever since I watched The Great British Bake Off do fondant fancies, I’ve been obsessed! I feel like I need to make them in every flavour possible, they’re just so fun and satisfying to bake. Over time, I’ve learned plenty of little tricks to make them easier, and in this post, I’m sharing all my tips and step-by-step guidance on how to make fondant fancies the simplest way possible. Whether you’re baking classic vanilla, chocolate, or a spooky Halloween fondant fancy, this guide will help you create perfect, bakery-style mini cakes every time.

Why You’ll Love These Halloween Fondant Fancies
- Spooky and fun– The orange drizzle, buttercream and chocolate sponge make them perfect for your Halloween dessert!
- Deliciously indulgent– A moist chocolate sponge paired with a vanilla flavoured, orange coloured buttercream and rich chocolate icing.
- Impressive yet easy– They look bakery-worthy but are simple to make with a few easy steps.
- Kid-friendly– Great for baking with kids or making cute, spooky treats for school lunchboxes or Halloween parties.
- Make ahead– These fondant fancies keep beautifully and taste even better the next day!

Ingredients
- Self Raising Flour– It gives the cakes structure while keeping them light and fluffy.
- Baking Spread – Adds richness, moisture, and that classic buttery flavour. I prefer to use baking spread in my sponges as i find it creates a fluffier sponge but feel free to use unsalted block butter.
- Light Brown Sugar– Light brown sugar helps the batter stay smooth and ensures the sponge has a tender crumb. I prefer using light brown sugar in my chocolate sponges but feel free to use caster sugar.
- Eggs– These bind the ingredients and help the sponge rise beautifully. Eggs create that soft texture that’s key to traditional fondant fancies.
- Vanilla Extract– A little goes a long way! It enhances the chocolate flavour and gives a warm, sweet aroma. Perfect for Halloween baking recipes.
- Cocoa Powder– Brings rich chocolate flavour and gives the sponge its deep, spooky look.
- Icing Sugar– Used for both the buttercream and fondant icing.
- Milk– Helps loosen the buttercream for easy spreading and adds creaminess to your icing.
- Food Colouring– Adds that signature Halloween pop of colour to your buttercream filling or drizzle. I used colourmill “orange”.

Step-by-Step Instructions
- Bake the Sponge:
Preheat your oven to 180°C (160°C fan) and line a square 8inch baking tin. Cream together butter and sugar, then mix in eggs, flour, cocoa powder, milk, and vanilla until smooth. Bake for 30–35 minutes or until a skewer comes out clean. - Cool and Slice:
Allow your sponge to cool for 5 minutes, carefully turn the tin upside down on some clingfilm and wrap your cake up. Let it cool in the clingfilm for a few hours, preferably overnight for best results. If your cake has domed slightly, keep this side flat on the surface to get it flatter. Wrapping it in clingfilm will keep the moisture in. Leaving it over night will allow your cake to become easier to slice and handle. Once cooled, remove the clingfilm and cut into 9 equal squares. - Make the Buttercream:
Beat butter and icing sugar together until light and fluffy, then add your orange colouring and vanilla if using. - Assemble the Fancies:
Core the middle of your sponges out and fill with orange buttercream. Pipe on a small dollop of buttercream to resemble classic fondant fancies.
These photos are from my biscoff fondant fancies but it shows how to make these halloween fondant fancies too!


- Coat in Chocolate Fondant:
Make your chocolate icing by mixing together icing sugar, cocoa powder and water. You want this to be a Pour-able Consistency. Pour melted chocolate fondant icing over each cake, covering completely. Do this on a wire rack to let the excess drip off. - Decorate:
Once the coating has set slightly, drizzle orange icing over the top for that classic Halloween look. - Set and Serve:
Allow the fancies to firm up before serving. Perfect for Halloween parties, autumn baking, or even gifting!


Tips & Tricks
- Wrap Your Sponge to Lock in Moisture– Once your sponge has cooled for about 5 minutes, carefully turn it out of the tin onto a piece of clingfilm. Wrap it tightly, this keeps the sponge soft and moist while it cools. For the best texture, leave it to rest in the clingfilm for a few hours or even overnight. This step helps your Halloween fondant fancies stay soft but sturdy for decorating.
- Flatten for Perfectly Even Squares– If your cake has domed slightly, make sure that side is flat against the surface when wrapping. This helps create even, flat squares without needing to trim too much. If your sponge isn’t level after cooling, you can slice off the top to make it neat.
- Chill the Buttercream Before Icing– After piping your orange buttercream on top of each sponge, pop them in the fridge for around 10 minutes. This helps the buttercream firm up slightly, making it easier to pour your icing over without it melting or sliding off.
- Get the Perfect Icing Consistency– Your chocolate fondant icing should be pourable but not too runny, think smooth and glossy. If it’s too thick, it won’t drip nicely down the sides, but if it’s too thin, it won’t coat evenly.
- Use a Piping Bag for Easy Pouring– Instead of spooning on the icing, transfer it into a piping bag. This gives you better control and helps you cover the cakes neatly while guiding the icing down the sides.
- Use a Cooling Rack to Catch Drips– Place your sponges on a wire rack set over a baking tray before icing. This lets any excess drip off and keep your clean up to a Minimum which is a plus, me and cleaning up aren’t friends.
- Let the Icing Set Before Drizzling Chocolate– Once your fondant icing has set completely, drizzle your chocolate over the top. Drizzling too early can ruin the pattern, so patience is key! Once the chocolate drizzle sets, your Halloween mini cakes will look spooky cute.
- Add Some Spooky Fun– For extra Halloween vibes, top your fondant fancies with themed sprinkles, edible glitter, or even candy eyes! It’s a fun and simple way to make these Halloween treats stand out even more at any party.
- You could use a crumb coat if you’d like. Spread a thin layer of buttercream over each mini sponge before adding the fondant icing. This seals in crumbs and creates a smooth surface for that signature glossy fondant fancy look. I didn’t feel like it was Necessary for this fondant fancy but the choice is yours!

Frequently Asked Questions
How long do these Halloween fondant fancies last?
They’ll stay fresh for up to 4 days in an airtight container at room temperature or in the fridge for 5–6 days.
Can I make them in advance?
Yes! These mini cakes can be baked and frozen for up to 2 months before decorating.
What’s the best icing for fondant fancies?
A simple chocolate fondant icing made with icing sugar, cocoa powder, and water gives the perfect glossy finish.
Can I use other colours for the drizzle?
Yes! Green or purple icing works beautifully for a spooky Halloween vibe.
Recommended Equipment & Ingredients
- Stand mixer Use code BITEOFBAKES for 20% off.
- Electric hand whisk
- Mixing Bowl Mine is pink of course!
- Scales
- Baking Tin (Square 8×8″).
- Edible Eyes
- Food Colouring
I earn a small amount of money if you buy the products after clicking on the links. You will not be charged anything extra for this! Thank you for supporting biteofthebakes!
Pin It
These Halloween Fondant Fancies are everything you could want in a spooky-season bake, cute, chocolatey, and fun. They’re the perfect balance of rich chocolate sponge, silky vanilla buttercream, and glossy chocolate icing, making them the best Halloween dessert that everyone will love.
Whether you’re baking them for a Halloween party, school lunchboxes, or just a fun weekend bake, these mini cakes are guaranteed to impress both kids and adults alike. They look fancy, but they’re surprisingly easy to make, especially if you follow my fondant fancy tips and tricks!
So grab your mixing bowl, some orange food colouring, and a drizzle of chocolate, and whip up a batch of these adorable Halloween Fondant Fancies.

Tried this recipe? Leave a comment Below I’d love to hear what you think!
Don’t forget to tag @biteofthebakes on Instagram or use the hashtag #biteofthebakes so I can see your delicious blondies!
Share your bake with our community over on Facebook!
Subscribe to the blog for more easy dessert recipes, baking tips, and exclusive goodies straight to your inbox.
More Halloween Recipes


Kid Friendly Halloween Recipes


Recommended


Halloween Fondant Fancies
Ingredients
- 150g Baking Spread
- 150g Light Brown Sugar
- 3 Medium Eggs (50g each).
- 120g Self Raising Flour
- 30g Cocoa Powder
- 3 tbsp Milk
Buttercream-
- 100g Unsalted Butter
- 200g Icing Sugar
- 3-4 Tbsp Milk
- 1 Tsp Vanilla
- Orange Food Colouring (Optional).
Chocolate Icing-
- 600g Icing Suagr
- 50g Cocoa Powder
- 100ml Water (You may not need it all or you may need a little more).
Decoration-
- 100g White Chocolate
- Orange Food Colouring
Instructions
- Preheat your oven at 180°C (160°C fan / 350°F) and line an 8 inch square tin and set aside.
- Cream together butter and sugar until light and fluffy. Add eggs one at a time, then fold in flour, cocoa powder and milk. Bake in a square tin for 30-35 minutes or until baked.
- Once baked, let the sponge cool in the tin for 5 minutes, wrap your sponge in clingfilm and place in the fridge for 30 minutes (this will help the cutting process and crumb coating) or on the surface overnight, trim the edges and slice the sponge into 9 neat squares.
- Core the centre of each sponge square. Make your buttercream by beating your softened butter until light and fluffy, add in your icing sugar, milk and a few drops of food colouring and beat until fluffy.
- Transfer your buttercream into a piping bag and pipe in your buttercream.
- Top each sponge with a dollop of buttercream (use a piping bag without a nozzle).
- Make a pourable icing with icing sugar, cocoa powder and water. Add the water slowly, you want to aim for a thick, yet pourable consistency! Set up a cooling rack with a baking tray underneath and coat each square completely with the icing and let them set.
- Melt your white chocolate in a microwaveable bowl, add a few drops of orange colouring and drizzle over the top for the classic French Fancy look. (Check tips and tricks for some fun ways to make these even more spooky for halloween).