These Coconut Miffy Bunny Sugar Cookies are the perfect Easter treat! Easy to bake and decorate, these adorable bite-sized cookies make a fun and festive Easter snack for kids and adults alike!

Sugar Cookies
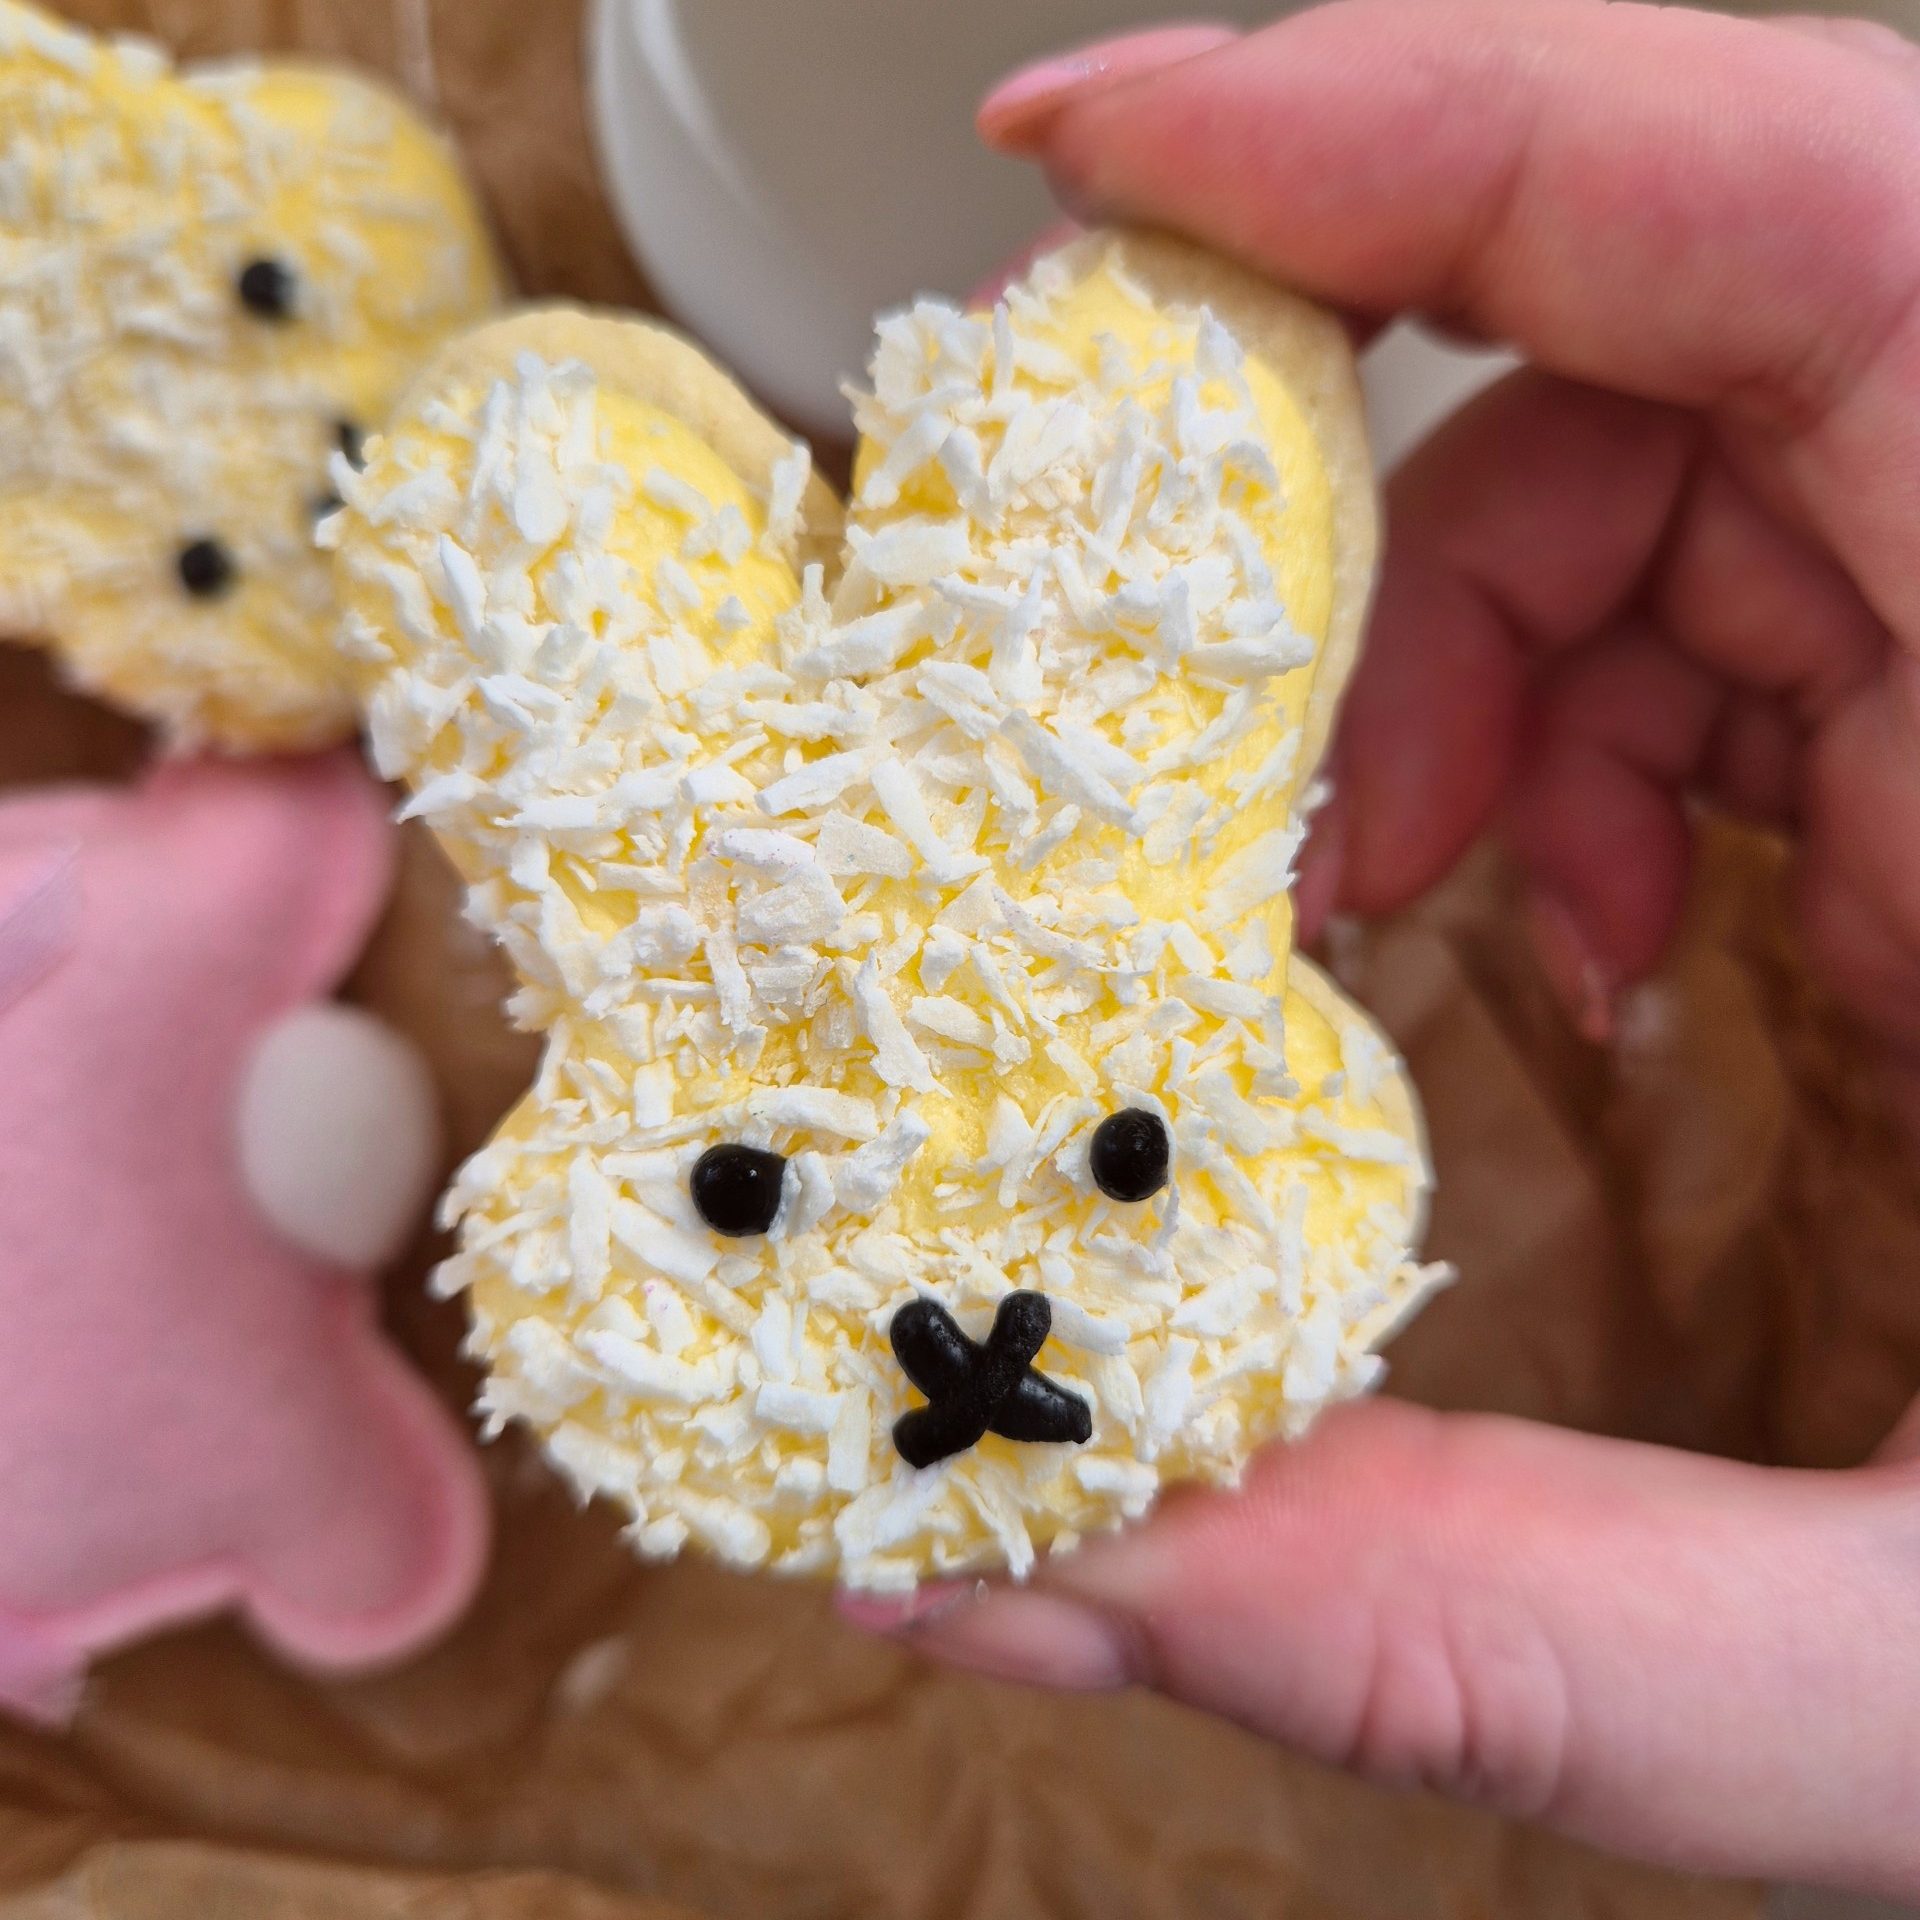
Firstly, can we talk about how cute these cookies are! I decorated them as Miffy the bunny for Easter and I didn’t want to eat them because they were so cute. I obviously did end up eating them and they were delicious!
This soft and delicious sugar cookie recipe is perfect as it holds its shape once baked, meaning you can cut out any shape you want! I chose a bunny face to stick with the Easter theme. I’m absolutely loving Easter baking at the moment so expect loads more!
I chose to make these sugar cookies coconut flavoured using this food flavouring! As I decorated these cookies with desiccated coconut to give the bunny the furry effect! You can of course flavour this cookie whatever flavour you’d like and decorate the bunny with sugar! You could try making the dough vanilla, strawberry or even cinnamon flavoured!

Decoration
If you don’t know who Miffy is, let me introduce you! Miffy is a beloved fictional bunny created by Dutch artist Dick Bruna, appearing in a series of iconic children’s picture books. Even more exciting, Miffy is celebrating her 70th birthday this year, which makes these adorable bunny cookies even more special and perfect for a fun, nostalgic bake.
I wanted these Miffy bunny cookies to have plenty of texture to give them that cute, fluffy “furry” look. Because the cookies are coconut-flavoured, coating them in desiccated coconut was the perfect choice. Not only does it enhance the coconut flavour beautifully, but it also creates that soft, fluffy bunny texture that makes these cookies so irresistible and visually adorable.
To decorate, I piped a layer of buttercream onto each cookie and then dipped them into the coconut. I found this method worked much better than sprinkling coconut on top, as it gives a more even and fuller coating but feel free to use whichever method works best for you.
To finish, I piped on the classic Miffy face. I originally tried using a black food gel, but honestly, it was quite tricky to pipe smoothly. In a moment of questionable judgement, I decided to microwave it… which I absolutely do not recommend. Let’s just say it exploded after five seconds and cleaning the microwave was not fun. Learn from my mistake! Instead, I highly recommend using melted milk or dark chocolate coloured black, which pipes beautifully and gives a clean, crisp finish to your Miffy cookies.
These cute Miffy coconut cookies are perfect for Easter baking, kids’ baking projects, themed parties, or simply a fun and creative bake that brings a bit of nostalgia and joy into the kitchen.

Ingredients
- Butter- For these Miffy sugar cookies I used unsalted block butter, ensure it is softened!
- Icing Sugar- The key ingredient to making these cookies melt in your melt and tender! I wouldn’t recommend using any other kind of sugar, it has to be powdered sugar!
- Plain Flour- You want to use plain flour only!
- Cornflour- This adds to the texture being soft and tender!
- Egg- This brings your dough together and helps your cookies keep their shape!
- Flavouring- I chose to use coconut flavouring for these cookies but you could use raspberry or even almond flavour! The flavouring is entirely up to you, be creative!
- Food Colouring- I didn’t colour my dough but feel free to colour yours! Id recommend using gel food colouring instead of oil based.

Why You’ll Love This Recipe
- Perfect For Easter- These Miffy-inspired bunny cookies are almost too cute to eat! Almost! Perfect for Easter parties, springtime baking, or a Easter snack!
- Fun & Easy to Make- With a simple sugar cookie base and minimal decorating, this recipe is super beginner-friendly and fun for kids to help with too!
- Bite-sized Dessert- Small, sweet, and perfect with a cup of milk, tea or coffee!
Tips & Tricks
- If you find your dough to be too wet to roll out, place it in the fridge for 10 minutes.
- Roll your dough out on a lightly “floured” surface, I use icing sugar/powdered sugar to stop my dough sticking to the surface!
- You will want your butter to be softened not melted as melted butter will make the dough too wet to work with!
- Once you have cut out your shapes, you NEED to chill this dough before baking. If you skip this then your cookies wont keep their shape and will spread when baking!
- Double the recipe to make more cute Miffy cookies, they are just so adorable!
Frequently Asked Questions
What Coconut Should I Use?
I recommend desiccated coconut for the best texture and appearance. It gives the cookies a soft, fluffy “bunny fur” and I used a drop of coconut flavouring from Foodie Flavours.
Can I make these Miffy bunny cookies ahead of time?
Yes! These Miffy cookies are perfect for making ahead. You can bake the cookies 1–2 days in advance and decorate them later. Store undecorated cookies in an airtight container at room temperature.
How long do these coconut bunny cookies last?
Once decorated, the cookies will stay fresh for up to 5–7 days when stored in an airtight container at room temperature. Keep them away from heat so the buttercream and chocolate details stay neat.
Can I freeze these Miffy cookies?
Yes! You can freeze the baked, undecorated cookies for up to 3 months. Thaw at room temperature before decorating. Freezing decorated cookies isn’t recommended as the buttercream and coconut may lose texture.
Can I make these cookies without coconut?
Absolutely. If you’re not a fan of coconut, you can skip the desiccated coconut or swap it for white sprinkles or sanding sugar. The cookies will still look adorable, just without the fluffy texture.
What’s the best way to pipe the Miffy face?
The easiest option is to use melted chocolate coloured black. It pipes smoothly and sets nicely. Food gels can be tricky to work with and aren’t ideal for piping fine details.
Are these cookies suitable for baking with kids?
Yes! These easy bunny cookies are great for baking with kids. Little ones will love dipping the cookies in coconut and helping decorate the faces, making them a fun Easter or themed baking activity.
Can I change the flavour of these bunny cookies?
Definitely. While coconut works perfectly for a fluffy bunny look, you can flavour the cookies with vanilla, lemon, or almond extract instead. Just keep the decorations light-coloured for the classic Miffy look.
Do I need special cutters for Miffy cookies?
A simple bunny-shaped cookie cutter works perfectly. You don’t need a specific Miffy cutter, the face details are what bring the character to life.
Are these cookies good for Easter and parties?
Yes! These Miffy bunny cookies are ideal for Easter baking, children’s parties, baby showers, or themed celebrations. They’re cute, nostalgic, and guaranteed to be a crowd-pleaser.
Pin It
These Miffy coconut bunny cookies are the perfect combination of cute, nostalgic, and delicious, making them ideal for Easter baking, spring celebrations, or themed parties. With their soft coconut flavour, fluffy texture, and adorable bunny design, they’re guaranteed to impress both kids and adults alike. Whether you’re celebrating Miffy’s 70th birthday, looking for fun Easter cookies, or planning a creative baking day with family, this recipe is easy to follow and incredibly rewarding. Simple ingredients, minimal decorating skills, and maximum cuteness, these homemade bunny cookies are sure to become a favourite spring bake!
Other Bunny Shaped Cookies


Recommended


Miffy Sugar Cookies
Ingredients
Cookies
- 100g Unsalted Butter (Softened).
- 100g Icing Sugar
- 2 Medium Eggs
- 280g Plain Flour
- 20g Cornflour
- 1/2 tsp Coconut Flavouring
Buttercream
- 125g Unsalted Butter (Softened).
- 250g Icing Sugar
- 50ml Double Cream (Optional, you could use milk).
- Desiccated Coconut (For the decoration).
- 50g Melted Milk Chocolate (Coloured with black food colouring, I use Colour Mill).
Instructions
- In a large bowl (I used my stand mixer with a paddle attachment but feel free to use an electric hand whisk!) cream together your softened butter and icing sugar.
- Add in your plain flour, cornflour, eggs and vanilla extract and mix together until a dough is formed. It will be quite crumbly at first but trust the process, it will eventually come to a dough!
- On a lightly "floured" surface, I use icing sugar. Roll out your dough with a rolling pin to 1/4 inch thickness.
- Once rolled, using your bunny cutter, cut out as many bunnies you can! You might have to re-roll your dough to get more bunny cookies! Try not to overwork the dough though as it will become tough.
- Place your bunny cookies onto a lined tray ( 3 cm apart) and place in the fridge/freezer for 30 minutes. Refrigerating them is very important for these cookies as it is what helps them keep their shape and stop them from spreading so don't skip this step!
- Preheat your oven to Gas mark 4 (180c).
- Once your cookies have chilled, bake them in the oven for 12-15 minutes. Mine take 13 minutes.
- Allow the cookies to cool completely before moving, as they are fragile when warm.
- While your cookies are cooling, make your buttercream. In a large bowl, beat your butter for several minutes until light and fluffy (I use a stand mixer with a paddle attachment but you could use an electric hand whisk). Add in your icing sugar and double cream and beat together for 3-4 minutes until your buttercream is smooth.
- Transfer your buttercream into a piping bag without a nozzle and pipe on the buttercream in the shape of the bunny cookie.
- Put some desiccated coconut onto a plate and dip your cookies into the coconut. This will give your bunnies that cute fluffy texture!
- Melt your milk chocolate in a microwaveable bowl and add black food colouring. Stir until fully combined. Transfer into a piping bag and cut a small hole.
- Decorate your Miffy cookies with two eyes and a cross as a mouth. Miffy is the cutest little bunny so these cookies are the perfect Easter treat!
Notes
- These will last 4-5 days in an airtight container, or you can freeze them for up to 3 months.
- I used this coconut flavouring from Foodie Flavours.
Ps. Are we friends on Instagram?
If you try this recipe, share it with me on Instagram @biteofthebakes or use the hashtag #biteofthebakes so I can see all your creations!